Thursday 28 April 2011

Stampscapes - Something different!

Hi All...
I was playing with the Stampscapes leafy branch and my 'Big n Juicy' dye ink pad.  After stamping a few branches off the page here and there for fun I turned on my little light bulb in my head!  I've got loads of different colours of stickles so brought them out and accented the different coloured areas of the branch with the same hue of stickles. 
I can't remember right now who produced the birthday sentiments package I bought but will add that once I know.  This quote is by Oprah Winfrey and I thought it was so lovely that all it needed was the branches for an accent. 
The blue background paper is unknown and from my stash.  The card is 5 X 7 so when using the Cuttlebug Swiss Dots I had to do it in sections.  When you do that, the smooth border of the embossing folder smooths out some of the dots.  That is easily fixed by laying the embossed paper on a foam pad and gently pushing the dots back out with the end of a stylus.
The card was finished off with three square purple brads.
Here are two photos taken at an angle so you can hopefully see the stickles.

 
Thanks for looking!  Thank goodness tomorrow is Friday!!
Hugs,
Sheree

Monday 25 April 2011

Post Wedding Thank You


Happy Monday Everyone!
The wedding is overwith and went well for the most part.  I made this card for the caterers as they did an outstanding job with the reception!  I gained 20 pounds from eating vast quantities of the most tender, delicious roast beef I've ever had in half a century, or more.

The stamps used were:
Main image and greeting:     Upsy Daisy - Stampin' Up!
Butterfly:                             On Gossamer Wings - Stampin' Up!
Greeting inside:                   In My Thoughts - Stampin' Up!

Paper:                                 Staples mottled tan, Michaels black
Ribbon:                              WalMart sheer black
Jelly Roll Platinum Star:       On butterfly wings
Scoring:                              Martha's scor board (love that thing!)
Pop Dots:                           1/16th inch thick
Ink:                                     Versamark black

This was a quickly thrown together card but think it turned out alright.  I finally used a couple of stamps I've had for quite a while now.  Will have to bring them out more often! 

The butterfly is stamped twice and popped up.  It needed 'something' and that's all I could think of!

Have a wonderful week my friends. 

Tuesday 19 April 2011

Optical Illusion Sympathy Card

First off... Hi Everyone!
I found out yesterday that our neighbour's dog passed away at 7 years due to liver failure.  She was a gorgeous, intelligent, mild mannered shepherd/lab cross and we will miss her dearly... along with our other neighbours with whom she'd go visit when she was bored.
I wanted to stick a little card in their post box because I knew their three young boys were heartbroken.
Now... before I see question marks show up on your foreheads I'd like to say that this card has squared corners and the sides are actually straight!  Being the wonderful photographer that can screw up a photo on 'auto-pilot,' it looks like it ate too many brownies!  Truth is... I ate too many brownies!


The main cardstock is from a batch I bought at Staples when the dinosaurs roamed the earth and it is a mottled tan.  Others are unknown except for the patterned which is sei Moonrise Moss.... From Crafty Capers - Nanaimo.  The ribbon is from Staples and the brown pearls from Dollarama.
The stamps on the main image are from Stampin' Up! along with the sentiment.  Inside the card I used Impression Obsession stamps.  Inks used were True Thyme and Old Olive from Stampin' Up! and Sage from.... an inkspot!  lol 
Now.. I'm sure it's the corners that make my card look fat!!  Good old Martha punches helped me achieve that effect.
There you have it!  Wish I could show you that it does really look anerexic (sp?)
Have a great evening and I'll be popping around to comment after I watch Glee!
Hugs,
Sheree

p.s.  I am still roaring about your comment on the Stampscapes post from earlier today Jacki!!!  I may try a hedge next time!!  I am a firm believer in 'Living On The Edge'!

Stampscapes - New Scenes With New Stamps

Good Afternoon Friends!!

Well, what a week!  One thing after another went wrong including.. I finished colouring one Stampscapes scene and picked up the ink pad to put away and it fell out of my hand, stamping green all over the sky!  I left it for a day and then added some branches to cover a few of the lines and inked over some.  I can still tell so.. I'll keep it to send to my brother!  haha!  He won't know the difference!  (I'm chuckling away here...can you tell?!)
The other things that went wrong were all in series.  First, a question!  How many of you have had a bird fly into your windshield or, had a rock chip?  Pick me!
I was driving down island to work on Thursday and got a rock chip from a large truck.  Okay, they can repair those now... no big deal.  Fifteen minutes later a huge black thing hit the windshield with a loud bang and then headed off to the side of the road.  I now think it was a large crow!  Now, if that isn't bad enough... 20 minutes later there was another thud!  I think that one was a starling or robin but it was still slightly dark at 6:15 a.m.  Yep... sure enough.. as soon as the sun came up over the horizon, I saw that my rock chip had now become a good sized crack which means the whole windshield needs replacing.  Enough of the gorey details and on to the cards!!  I just had to get my boo hoo story out!!

Card #1
There's quite a few new stamps used in this scene so... I'll list them all by code!
146F  Crooked Path
140E  Cabin
243A  Fir Row
245B  Black Oak
251C  Sedge Filler
229A  Doe
222F  Twisting Pine
240B  Maple Trio
266D  Tree Cluster Small
301A  Rocks and Grass
277F  Leafy Branch
067B  Reeds
302A  Gulls

The Adirondack Dye Ink pads used were:
Lemonade                                Meadow                                Willow
Aqua                                        Black                                    
Ranger Distress Ink pads:
Fired Brick                              Frayed Burlap                       Walnut Stain
Memento Dye Ink pads used:
Cantalope                                Cottage Ivy                           

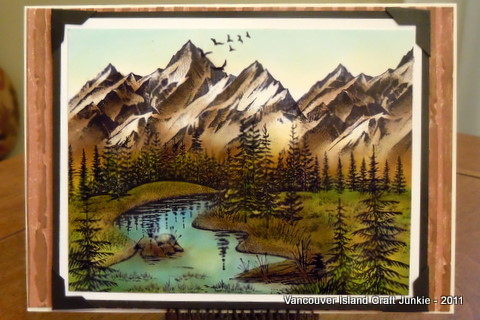
Card #2  (This is the one I dropped the ink pad on!!)

If you look closely, you'll see the green stripes from the ink pad edges!  This photo looks a lot brighter than it actually is due to the glorious sunshine that was pouring through the sheers this morning!
If you've seen my other Stampscapes cards you'll be able to recognize the new stamps!  For some reason my 'colour mojo' wasn't working too well hense the bright autumn like colours.

Stamps used in this scene were:
301A  Rocks and Grass
266D  Tree Cluster Small
277F  Leafy Branch
279F  Pond
245B  Black Oak
251C  Sedge Filler
243A  Fir Row
240B  Maple Trio
Scene set #1 - Hill With Trees
Scene Set #1 - Rocks In Water

Adirondack Dye Ink Pads Used:
Willow                                     Lemonade                            Citrus
Aqua                                         Stonewashed                       Denim
Meadow
Distress Inks Used:
Frayed Burlap                          Fired Brick                          Walnut Stain
Weathered Wood                     Crushed Olive
Memento Dye Ink Pads Used:
Cantalope                                Cottage Ivy                           London Fog

There you go!  Now you have to figure out where all of those were used!  Haha!
Actually... If anyone would like me to post step by step photos... Just ask!
Have a wonderful work week!
Hugs,
Sheree

** One quick note!  I forgot to mention that I added Jelly Roll 'Star' pen accents here and there.  Brown (turned out glittery bronze) was used on tree trunks and branches.  Blue star is on the waters and then highlighted again with Sky star.  The white daisy dots are done with a Jelly Roll plain white pen and red leaves and flower dots were Jelly Roll Red star.

Monday 18 April 2011

A New Award!

I signed in to my blog this morning and saw that I received an award from Lori at Refelctions From Granny !!  I'm just beside myself  here in front of my computer screen!!  Okay.. only doing backflips !
Thank you so much for thinking of me Lori!  You've made my whole week!
 
So, here are the two rules that come with this award:
 
1. Post about the award on your blog with a link back to the sender.

2. Pass onto those who visit your blog and leave comments regularly.

This is a hard decision to make because everyone who leaves comments deserves one but....My five friends who I'd like to pass this award on to are: 

1.  Gail - Pop, Paper, Sissors          
2.  Nancy - Crafting Passions
3.  Sherri - The Cat Ate My Card
4.  Priyanka - Priyanka's Creations
5.  Jacki - Cards by Jacki

Congratulations girls!  I enjoy reading all of your comments!  If only I could give this award to everyone who follows my blog.  You all deserve it!

Hugs,
Sheree

Wednesday 13 April 2011

Zesty Thanks!

Good Morning Everyone!

Just another quickie post today.  I needed a thank you card to send to one of our customers because I've made some Mason Bee houses and he's supplying me with the bees!  Can hardly wait to see how many apples we'll get this year!

The papers I used are unknown except for the one behind the 'Thanks' which I did with alcohol inks.  The solid orange/yellow is from an old stash of Stampin' Up! I have.  The bow was done on the 'Bow Easy'.  The stamps are from Stampendous and it's the first time using them... Wish I had brought them out sooner!  Copics were used to colour the letters.
I just love the cards at Feline Creative so tried a layout of my own.  Karen creates the most beautiful cards so I layered my papers and stitched the edges similar. 
Everything went together well and looked great.  I should have stopped there!  While watching a show I wondered how the letters would look with more stickles but in Orange Peel.  The orange shows up a little too much for my liking but... it was too late to turn back.  They say you learn something new every day and.. I have once again!
Thanks for looking and hope you have a wonderful Wednesday!

Monday 11 April 2011

Stampscapes - How light affects dye inked images!

Happy Monday Everyone! This is just a quick post today.   I wanted to show you how your scene can lighten up just by being placed in the open with dull lighting!

The two photos above are actually one and the same.  I left them on the dining room table today and even with diffused light coming in through the sheers, it's amazing what can happen!  A scene can become even more real like without doing anything to it.
The neat thing is.... you can't screw up with your colours.  If you stamp a beautiful scene and then painstakingly colour it with dye based inks and find that the colours are too vivid, too dark or what have you when you're finished.... let them sit out to fade a bit and then ink over top of what you've already done!  Simple!
In my last post I coloured three scenes, each a bit differently.  Everyone has their own favourite with the originals, but, now that the colours are toned down... will they have a new favourite from the bunch?  From what I see... I like the toned down grasses but, the water has lightened up too much and reminds me of the ocean in the Carribean.  The only time you get streams that even closely resembles that colour you need to go high up in the Rocky Mountains where the water is sooooo cold you wouldn't dare dip a toe!  Even then they would be more of an ice green tint.  In a valley, such as this scene portrays, the water would seem just as clear but would definitely be darker.  If I were to add more colour, I'd add Distress Weathered Wood to the areas the sun doesn't bounce off of.  (Tip of the day!)
I'll now post the before and after photos of the other two and we'll see what comments I get!  This should be interesting!!


Scene #2
Before

After

Scene #3

Before


After


I'm going to be working on new scenes and a Tips and Tricks posting shortly.  Hopefully I'll be able to pass on some tips that I've had to stumble onto while trying different things on my own.  That posting will be one that I'll continue to add to for as long as I do Stampscapes!

Have a wonderful evening and I'll talk to you all again soon!

Hugs,
Sheree

Sunday 10 April 2011

Stampscapes - Same But Different!


Here it is Sunday evening already! Another six day work week ahead and thought I'd play a bit to take my mind off it!
I received my new Stampscapes stamps late Thursday and spent a few minutes here and there on Friday and Saturday mounting them. So.. here is a new scene I've done using some of the new ones! I'll be practicing with them on paper for a while trying to get the depth right with stamp placement so that the deer don't look like they are Herculean!! In future scenes you will also notice that I finally have the fly fisherman that is knee deep in water so that I won't make the mistake of having one walk on water again! There's only one person that ever lived that's able to do that! haha!
I'll be showing you three scenes tonight. Each one is placed similar and coloured similar but, these will show you that no matter how you try.... each one will turn out different! I've also mounted the three on different backgrounds that will bring out certain colours in each one.

Number One is the picture up top!  (Like you wouldn't have known!)  The background paper is sort of a sage green and I distressed the edges with Crushed Olive and Frayed Burlap.  The mountains in this one are done in Frayed Burlap Distress and Distress Walnut.  I'm trying different colour combinations to see what looks best.  Trouble is that I like them all!  And... I really like how the water turned out as well!

Number Two:
This second card doesn't have the fisherman in it.  I was going to put a doe in the field but she was a bit too large and would have looked funny.   The mountains in this shot are done with Distress Frayed Burlap, Distress Walnut and then highlighted at the bottom with Memento Cantalope.  The shadows in front of the fir trees is done with Adirondack Black.  Cantalope highighted the grass here and there as well.  The background paper for this one is a mottled tan which I put through the Cuttlebug using the bark folder.  Because these cards are all 5 X 7 I had to put the paper through the CB twice, laying the folder down using the full width of the CB.  Once it was embossed I took the Distress Frayed Burlap and rubbed it back and forth over the embossing until I got the look I wanted.

Number Three!! 
This shot shows the mountians inked first with Distress Frayed Burlap, then Distress Walnut and finally with Memento London Fog.  I like the way they look with less snow and more of a grey granite look.  The base of the mountains looks bright in the photo but it really isn't that bright!  I sponged on Frayed Burlap and then Memento Cantalope to lighten the dark base.
The background paper was a piece I had in my trimmings and the edges were distressed with Crushed Olive and Walnut.
 
Now.....  Here's the list of stamps I used for all three!
 
Stampscapes Nature Sheet #1
Rocks in water, Country stream large, Grass, Log in water
031A - Fisherman
243A - Fir Row
251C - Sedge Filler
295C - Lilly Grass
302A - Gulls
301A - Rocks and Grass
211C - Rocky Peaks Small (I'll have to double check that one!  I think it's bigger!)
 
Inks used:
Adirondack
Willow, Lemonade, Meadow, Aqua, Stonewashed, Black
Distress -
Frayed Burlap, Weathered Wood, Crushed Olive, Walnut
Memento -
Cantalope, Cottage Ivy
 
I'll write more directions in the morning.  Hope you all had a wonderful weekend!


Friday 8 April 2011

Stampscapes Have Arrived!!

The stamps I've been waiting for from Stampscapes are in my hot little hands!  Woo Hoo!!  I'll be mounting them tonight and tomorrow and then let the new creations begin! 
Watch for new scenes being posted soon!

Wednesday 6 April 2011

Flourishes Mother's Day

Happy Wednesday All!
I must be on a sweetpea kick!!  Not only am I on my second post this week.. It's another Flourishes Sweet Pea card!  Hopefully this card will be fine to enter at
The Outlawz challenge blog!
The image was coloured with copics.  I will add the colour numbers later as I'm posting this at work and everything is at home.  The lavender background paper is from K&Company.  I stamped the green plaid myself and mounted it on cream paper from Michael's.  A Martha Stewart corner punch was used and it's from one of the punch around the page sets.  The cream paper was punched with a Fiskars punch.  I distressed the sentiment with Old Paper and the sentiment is from Just Rite Stamps.
After colouring the image I highlighted areas with Diamond Stickles.  I also coloured petals on a second stamped image and cut out pieces to prop up for a 3D effect.


Thanks for looking!
Challenges:
Simon Says Stamp Challenge - Spring Colours or Easter

Sunday 3 April 2011

Flourishes Wedding/Birthday/Girlie Card

Good Evening My Friends!
Sorry about not posting much this past week...errr..nothing!  I've been busy in the yard and with all the nice weather the shop has been busier than heck!  That's a good thing in general but not for blogging!
I've been playing with this Flourishes card for days now.  The stamping and colouring were the easy parts!  This is one of my favourites and made the mistake of picking papers after I coloured instead of before.  BIG lesson learned!
The image was coloured with the following Copics: YR00, RV21, R85, RV34, YG13, YG63, YG67 and C2.  I'm my own worst critic but really like how this turned out!  I coloured two images and then cut out pieces of one and layered them onto the original for a 3D effect with 1/16th thick pop dots.  Some of the dots had to be cut into tiny pieces in order to make them not show.
Background papers are from Bazzil (sp?), K & Company along with unknown.  The paper doilies were from my Candy that I won from
T-Bear's Touch blog owned by Trisha!  Did I ever get some beautiful items in that box!  I purchased a new Fiskar's punch at Wally World today and used it for my butterfly along with Glossy Accents and bling.  Two background papers were cut out with Spellbinders and the pink embossed with Swiss Dots.  The edges of the doilies and the patterned background paper were distressed with Old Paper.  I also added Diamond Stickles to the sunkissed areas of the Sweet Peas and Leaves.
The tough part with this card is trying to figure out how I can embellish some more with ribbon.  I've tried two different types of bows in two different types of ribbon and I'm stumped!  This past week I've been trying different papers, positions on the card along with others but this is as far as I've gotten.... yikes!  Any ideas??
Thanks for looking!  Hope you all have a wonderful work week!

Hugs,
Sheree

Challenges:
Craft Your Passion - Anything Goes
The Crafty Pad - Flowers