This tutorial is posted on my blog and will be posted on the Create A Scene blog commencing Sunday, January 15th!

Here is a quick tutorial on how I achieve skies in my Stampscapes scenes. I have had many requests by my blogging friends to do a tutorial for them to learn from.
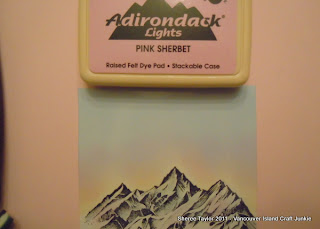
For these I work on glossy cardstock. I have found that blending is easier on glossy rather than regular cardstock unless you are using Distress Inks. The stamp pads used are shown in each photo and at the end of this post I will list the recipe! When working on glossy card stock I find that Ranger Adirondack dye inks along with Memento dye inks work the best for blending.
Everyone sees their surroundings in a different light. This is how I see my skies where I live, (When it's not raining!). This is one way of colouring the sky. Just as there are thousands of different scenes shown on the internet, there are thousands of ways to colour your sky. Always remember that there really is no wrong way of doing things. We are all artists at heart!

Step 1: I lightly tap in yellow along the mountain tops, or along the horizon of the scene. Don't worry about getting too much yellow in there. At first it may seem too bright but these dye inks will fade! When using your stylus, make sure you aren't heavy handed. Instead of blended colours it will look like coloured footballs all over your scene.
 Step 2: We are going to tap in the blue for the sky this time. For this I always start out using Adirondack Aqua or Memento Summer Sky. Load your stylus with ink and tap in colour starting at the upper edge of the sky and work towards the yellow. This step will take a few minutes. These colours are light but appear darker with every layer to add. For me, this is the boring part!! It's worth taking your time though.
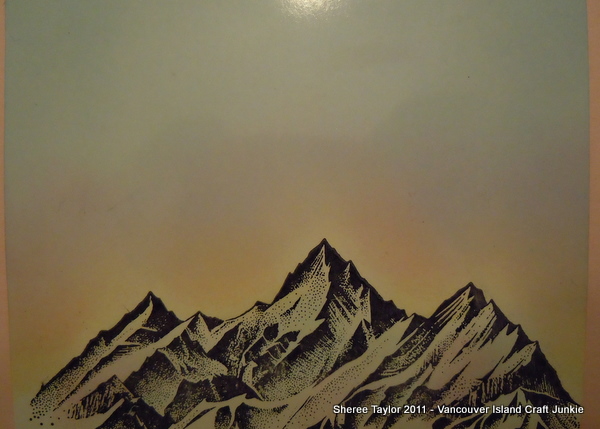
Step 3: Now is when we start adding the colour! I tend to use pink and very lightly tap in colour. Once again, dye inks will fade so don't despair if you feel you've overdone it! This is also the point where I will add more colour to show sunsets or a sunrise. As you add darker colours like a fiery fushia or orange, keep in mind that these colours are darker so you'll have to watch how much you add. Load your stylus and tap on dry, scrap paper to remove most of the ink. Layers of colour will intensify your sky but too much in a darker hue, too soon, can ruin your beautifully stamped scene! I am still playing around with incredibly colourful sunrises. Whenever there's a clear morning I look to the horizon when out with the dogs. Yes, when there's a beautiful sky to take in... I put everything else on ignore! haha!

The photo above shows how dark the colours are when I've finished my sky.

This next photo shows just how much the sky lightens when sitting overnight! If you find it's too light, now is the time to add more colour. Also, I always put a touch of colour from the sky onto the face of the mountain. I added a bit more in this shot so you would be able to see it but normally add just a touch.
I also put my Stampscape scenes together by building them around a sentiment I want to use. Sometimes just one or two stamps will do the trick so don't ever feel pressured to create a scene that always has one of everything in it!
Sky Number Two!
Okay.. this doesn't look like much but I wanted to show you how to stamp the clouds as it took me a while to figure this tip out.

The sky above looks like it would be hard to do but in reality... it's easy peasy!!
 Here's what the rubber Stampscapes stamp looks like.
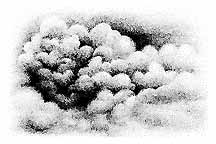 This is what the image of 018E Cloud Cumulus looks like in black and white. I imported this image from the Stampscapes web-site.
To achieve the sky that I stamped in the photo, load the stamp with Distress Ink Walnut. Now don't stamp right away! Use a dry paper towel and gently dab along the edges of the stamp so the image will feather out. I also lightly dab the dark area in the middle of the stamp because I wanted this piece to look like an aged photo. Also, if you don't dab the edges of the stamp you will get a rectangle of clouds that will be hard to match up.
If you are creating a sky on a larger piece all you have to do is keep stamping, but change up the stamp by turning it upside down here and there as well. Always remember to feather the inked edges with a dry paper towel so everything will blend together nicely.
There you have it! Simple skies the way I do them! I'm hoping to find out how to colour the Northern Lights one of these days. They are gorgeous!
Have a wonderful weekend and Happy Stamping!
Hugs,
Sheree
Inks used in this tutorial for the sky...
Ranger, Adirondack Dye Inks: Aqua, Lemonade, Pink Sherbet
Memento Dye Inks: Summer Sky
Distress Ink Pad: Walnut
Inks used to finish colouring the mountains on the finished piece for the tutorial:
Distress Inks: Frayed Burlap, Gathered Twigs, Iced Spruce
Memento Dye Inks: London Fog
Stamps used on finished piece used for the tutorial:
Stampscapes 188F - Rocky Peaks
Stampscapes 302A - Gulls
ColourBox Stylus
Ranger Distress Applicator
PS ... Don't forget to keep checking our challenge blog Create A Scene for more tutorials done by incredible artists from our design team. Become a follower and enter the challenges while you're at it!
PPS ... I just noticed that I forgot to trim off the bottom of the scene because I wasn't going to stamp tree tops in front of the mountains... OoooopS!!

Here is a quick tutorial on how I achieve skies in my Stampscapes scenes. I have had many requests by my blogging friends to do a tutorial for them to learn from.
For these I work on glossy cardstock. I have found that blending is easier on glossy rather than regular cardstock unless you are using Distress Inks. The stamp pads used are shown in each photo and at the end of this post I will list the recipe! When working on glossy card stock I find that Ranger Adirondack dye inks along with Memento dye inks work the best for blending.
Everyone sees their surroundings in a different light. This is how I see my skies where I live, (When it's not raining!). This is one way of colouring the sky. Just as there are thousands of different scenes shown on the internet, there are thousands of ways to colour your sky. Always remember that there really is no wrong way of doing things. We are all artists at heart!

Step 1: I lightly tap in yellow along the mountain tops, or along the horizon of the scene. Don't worry about getting too much yellow in there. At first it may seem too bright but these dye inks will fade! When using your stylus, make sure you aren't heavy handed. Instead of blended colours it will look like coloured footballs all over your scene.


Step 3: Now is when we start adding the colour! I tend to use pink and very lightly tap in colour. Once again, dye inks will fade so don't despair if you feel you've overdone it! This is also the point where I will add more colour to show sunsets or a sunrise. As you add darker colours like a fiery fushia or orange, keep in mind that these colours are darker so you'll have to watch how much you add. Load your stylus and tap on dry, scrap paper to remove most of the ink. Layers of colour will intensify your sky but too much in a darker hue, too soon, can ruin your beautifully stamped scene! I am still playing around with incredibly colourful sunrises. Whenever there's a clear morning I look to the horizon when out with the dogs. Yes, when there's a beautiful sky to take in... I put everything else on ignore! haha!
The photo above shows how dark the colours are when I've finished my sky.

This next photo shows just how much the sky lightens when sitting overnight! If you find it's too light, now is the time to add more colour. Also, I always put a touch of colour from the sky onto the face of the mountain. I added a bit more in this shot so you would be able to see it but normally add just a touch.
I also put my Stampscape scenes together by building them around a sentiment I want to use. Sometimes just one or two stamps will do the trick so don't ever feel pressured to create a scene that always has one of everything in it!
Sky Number Two!
Okay.. this doesn't look like much but I wanted to show you how to stamp the clouds as it took me a while to figure this tip out.

The sky above looks like it would be hard to do but in reality... it's easy peasy!!

To achieve the sky that I stamped in the photo, load the stamp with Distress Ink Walnut. Now don't stamp right away! Use a dry paper towel and gently dab along the edges of the stamp so the image will feather out. I also lightly dab the dark area in the middle of the stamp because I wanted this piece to look like an aged photo. Also, if you don't dab the edges of the stamp you will get a rectangle of clouds that will be hard to match up.
If you are creating a sky on a larger piece all you have to do is keep stamping, but change up the stamp by turning it upside down here and there as well. Always remember to feather the inked edges with a dry paper towel so everything will blend together nicely.
There you have it! Simple skies the way I do them! I'm hoping to find out how to colour the Northern Lights one of these days. They are gorgeous!
Have a wonderful weekend and Happy Stamping!
Hugs,
Sheree
Inks used in this tutorial for the sky...
Ranger, Adirondack Dye Inks: Aqua, Lemonade, Pink Sherbet
Memento Dye Inks: Summer Sky
Distress Ink Pad: Walnut
Inks used to finish colouring the mountains on the finished piece for the tutorial:
Distress Inks: Frayed Burlap, Gathered Twigs, Iced Spruce
Memento Dye Inks: London Fog
Stamps used on finished piece used for the tutorial:
Stampscapes 188F - Rocky Peaks
Stampscapes 302A - Gulls
ColourBox Stylus
Ranger Distress Applicator
PS ... Don't forget to keep checking our challenge blog Create A Scene for more tutorials done by incredible artists from our design team. Become a follower and enter the challenges while you're at it!
PPS ... I just noticed that I forgot to trim off the bottom of the scene because I wasn't going to stamp tree tops in front of the mountains... OoooopS!!
22 comments:
Amazing tips, Sheree. Thank you! I can't wait to try it. NancyD
Some great advice here and I love the different shades in the sky. Thank you for sharing!
Great tutorial.Thanks, hugs lin
Wonderful tutorial Sheree...very interesting how your terrific scenes come to be.
ah Sheree really great tutorial love the way you use the layers and like I do with the brayer must admit ten d to do that with Stampscapes going to have to be more adventurous I think - also have not many stamps really to creat a scene I have realised - just a few really, I to have to invest in some more one day.. the hears on this blog were rather distracting while I was trying to tread the post - are they put on by you? did not quite know for sure as seems odd to my mind, easily distracted, I know - like to concentrate on one thing I guess - I shut off music on blogs but could not with them.
Love and God bless, Shaz
girl, I can see right now, I am going to learn so much from you, this is fantastic, can't wait to try it!!!
Gorgeous, I'm not sure about easy peasy, but, I'm getting better at stamping with your tips.
Oh, oh, Chicken Little the sky is falling lol. I see it raining hearts, I do!
Hugs, Lori m
Me again, Sheree - realised afterwards they are prob for Valentines day coming up we dont do it that much over here but know it is big elsewhere - lots of thanks for this really great detailed work Sheree - just back from having a blast at the Stampscapes site h what fun - have my list too just going to have to cull it that is all...sigh but grateful we can order overseas thoguh some sites in USA wont do that, Love Shaz.x
Sheree, Welcome to your first design team and I am so glad that it is with Craft a Scene! Thank you for such a great tutorial and finished card. You are more of an inspiration than you know. NancyD
WOW! Your cards are stunning! Amazing the difference between the mountain scene sky from when it's wet to the next morning after it's dried well. Thanks for sharing your technique and tips!!
Thanks for giving me the opportunity to be on your design team!! So excited!
Love your card, and how you describe how you did it, can't wait to spend time in my craft room to try it out. Take care, Anja
Sheree,
Thanks for the great instructions. Sky's are really hard and this will sure help. Keep those tips coming :)
I've been trying to post & finally got it working, I think. Gorgeous stampscapes!!! Thanks so much for telling us how you made them!
I am going to have a go at making a card using this technique Sheree, as you know I love my brayer but you have achieved some great results here! I just love the colours .... I know the tutorial must have taken sometime to put together so many thanks for that .. Love and best wishes Eileen xxx
Very impressive! I must try this sometime and now I know where to get some instructions and inspiration. Thank you! The falling hearts made me dizzy.
Very impressive! I must try this sometime and now I know where to get some instructions and inspiration. Thank you! The falling hearts made me dizzy.
This is gorgeous Sheree and you did such a good job with the tutorial! The verse on the card is perfect too!
Thank you for that awesome tutorial. You have explained something I had not realised, how the inks fade back. I am glad you could see the vineyard as I did. I wish I could remember how I got that sky - I really must write these things down. I will certainly try to join you on each Scene challenge in the future. xx Maggie #90
Hi Sheree just letting you know Eileen have been good as her word and made two and linked over to you too (and me) :D love Shaz.x
This is really cool!
Thanks for the tip on the cloud stamps. I always had issues trying to use them until I follow your tip. I now like using the sky and cloud stamps. Thanks!
Robin
www.robinsrooost.com
Terrific!
Post a Comment