Wednesday 29 February 2012

Color Challenge - The Outlawz

Good Morning Chicks!

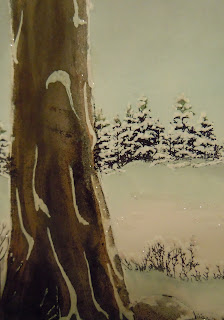
The colour challenge this week at The Outlawz is Black, White and the third colour is your choice.  Here's the inspiration photo!


After a long while scratching my head I came up with the following design.  My mojo wasn't letting my put patterned papers together or allowing me to pick an image to colour so.... this is what I ended up with!

I started with black cardstock for the base and then white for the top.  Using the arrows on the cutting blade I cut a rectangle that was 1/2 inch all the way around.  The middle piece was made a touch smaller by cutting off 1/4 inch from two sides.  When you stick everything together it looks like a frame of sorts. 

Here's the photo of my card!  It almost has a tailored look to it.  Not too girly and not too manly.


The recipe is....

Stamp - Stampin' Up!
Paper:  Recollections, Staples 110lb white
Pop Dots
Inkessentials/Ranger Liquid Enamel

Quick and easy!!

Thanks for looking and have a wonderful day!!

Hugs,
Sheree

Monday 27 February 2012

Green Blend Award!


I did some blog hopping this morning and found that I won an award from Lori - Reflections From Granny!  Thanks so much for thinking of me when handing this out!  Now it's my turn to pass this on to people who meet the requirements!

Picking 5 of my wonderful friends to receive this award was very difficult!  I think everyone deserves this because we all help each other! 

Here are the terms under which this 'Green Blend Award" are to be given.

1.) This award is for any co-blogging friend who has helped your blog in any and all ways.

2.) This award is for any co-blogging friend who has cheered you along in your blog building, craft advancing career.
3.) This award is for any co-blogging friend who always stops by and is kind to you. you can count on them to always be one of the great comments at the end of your posts.

4.) This award is to be given to 3 to 5 Blends whom you feel meet the listed requirements.

5.) Create a post with the terms of use and publish your Blends of Choice.

6.) Blend of choice may copy the award from your blog and proudly post it on theirs.

7.) Blend of choice may continue the kindness by issuing this award to keep the circle forever growing.

I am passing this award to the following blends:
NancyD from Crafting Passions

Congratulations my dear friends!!

Hugs,
Sheree

Sunday 26 February 2012

Guest Designer At Quirky Crafts Challenge!


Good Day Chicks!

Last week I won a challenge at Quirky Crafts Challenge and was so excited!   When I finally realized and responded I was asked to be a guest designer for their new challenge starting today!  How about that! 

The theme for this challenge is The First Signs of Spring!  The sponsor for this challenge is The Stamping Boutique  You MUST go over and check out all of the designs for digi and rubber images.  I'll definitely be going back there for more as she has the nicest digis of flowers in watering cans that I've seen yet.

The daffodil design I chose to use is here.  I originally wanted to colour the watering can and tulips digi but when I started to colour... my grey copic died on me!  I must head to the store for some must have shopping.  When I get the right colours I will  be doing a card using it.  Can hardly wait!

Another requirement for the DT was to make a First Signs of Spring card using the Double Z-Fold Card.  Another 'first' for me!  I think it turned out kind of kewl so will probably end up making another one!

When I did the daffodil I printed out one more so I could colour a few different parts and then cut them out and use them for a 3D effect on the flower and leaf.  I'm not sure if you can see it but there's a few drops of  Glossy Accents to imitate dew drops.  Lastly I used some yellow stickles to add a bit of glimmer.

The recipe is as follows:

Daffodil Digi:  The Stamping Boutique
Sentiment Stamp:  Studio G (Dollar bin at Michaels)
Butterfly:  Stampin' Up!
Paper:  Three Bugs In A Rug, Bazzil, Staples 110 lb. White
Copic Sketch Markers
Stickles
Ribbon:  WalMart
Punches and Sewing Machine
Pop Dots

There you have it!  I'm off to have another look at The Stamping Boutique Digis!

Hope you all have a wonderful work week!
Hugs,
Sheree

Challenges:

Kenny K's Krafty Girlz - Spring Zing - Springy as possible - 03032012
One Stitch At A Time - Use a Digi - Spring/Easter - 03032012
Pan Pastel UK Challenge Blog - Use A Ribbon - 03032012
Stamp A Lot Challenge - In The Garden  - 02292012


Sunday 19 February 2012

Trying Something Different!

Good Evening Chicks!

Well, the weekend is only hours from being over and the long work week begins. :o(  I tried making flowers like Kittie does here and then combine them into a spray here.  It's been a couple of weeks since I perused her outstanding step by step details so you will note that hers are waaaayyy better but, I did give a valiant effort!

This first card is one I did to enter a Penny Black challenge for colour.  The three colours I chose to use were white, cream and green.  The sentiment is one we all know but the stamp itself came from Penny Black.  The flowers and spray were done from memory and I added the pearls after to give it a little something extra because it looked kind of bland.  If I had Kittie's embossing folders I'd be on cloud nine!  They are gorgeous!

This second card looks sooo much better in real life!  I couldn't get the lighting in the dining room to work with me at all.  I started with a sticker from a set I bought at WalMart a while ago.  It is a clear, pearlescent (sp?) sticker that I mounted on white card stock and cut out, then popped it up.  The flowers and spray were done by memory again and I added a bit of Diamond Stickles to the tips of some petals.  Not sure if I like the ribbon along the bottom but it was part of the Wednesday Sketch Challenge.  I just took a look at the sketch again and I should have a bow on the ribbon but it would have been too much with all the flowers I think.

So, there you have it!  I hope you all had a wonderful weekend and I will post something again very soon!

Hugs,
Sheree
Outlawz Sketch Challenge
Penny Black Colour Challenge... Can't find the challenge now!!  :o(  Oh well.

Monday 13 February 2012

Stampscapes - Spring Meadow


Evening Chicks!
Here's a quick post for tonight!   I actually started this Stampscape  couple of days ago.  I've been doing quite a few snow scenes of late and, that's the theme for us over at Craft A Scene for the month of February!  It was pouring rain with wind a few days ago and all I could think about was Spring getting here as fast as possible.  The heavens listened and for three days, including today, we are having sunshine here on the west coast!
I wasn't prepared to give my 'Stamp Eater' a bath today but had to do one with the hose outside.  Poor thing was shaking and cold but, she had found two deep mud holes filled with water and decided that today was the day she'd try and dig to China!  There was water and mud flying all over the place and I'm really not sure how she could put her whole head down in there.. eww!  I'm sure you all know what swampy soil smells like which is why the big goof had to be done with the hose outside.  All is well now.  She started liking me again an hour ago!
Back to the scene!  I stamped this one twice and ended up with one good one.  I'm wishing I would have extended the tree line on the horizon but, it's done and I'm going to put effort into thinking up a new one instead.  I kept the colours (Canadian spelling!)  fairly light, as light as possible.  The initial colouring looked quite dark but, dye inks fade so I left it out on the table and added more colour the following day.  
Once that phase was done I brought out my JellyRoll Star pens and dotted in wild flowers and also added highlights on everything with my white paint pen.
I left the scene on my craft table (should call it a mountain instead) and it lightened up again perfectly!  The lighter colours were quite dull though so I took my stylus loaded with Memento Cantalope and went over everything with it.  What a difference!  The trees popped, the dull rocks looked more rocky and the spring grass looked new, as it should!
Next was mounting, cut an insert to stamp the sentiment on and voila!

The recipe is...
Stamps - Stampscapes!
057G - Meadow Large
196F - Pine Tree (My favourite!)
299B - 3 Rocks And Grass
301A - Rocks And Grass
302A - Gulls

Inks...
Adirondack - Aqua, Mushroom, Meadow, Lemonade, Black, Citrus
Memento - Cantaloupe, Morning Sky, London Fog, Bamboo,
Distress - Frayed Burlap, Crushed Olive

Ribbon - Michaels
Paper - Glossy, Recollections, Costco Jumbo Pack
Crimper

Hope you all have a wonderful work week and I'll post again soon!

Hugs, Sheree

Monday 6 February 2012

Odds & Sodds Times Four!

Good Evening Chicks!

I have four cards in the post tonight.  I've been working on putting them together for the past couple of days..rearranging this and rearranging that when I had a few minutes here and there.  I'm happy with the outcome although not jumping up and down haha!

This first card was done using the Penny Black stamp from the Slapstick collection.  I've been wanting this one for a very long time and accidentally found it.. up here in Campbell River!
The ducks are coloured with copics; The candy hearts are from a Fiskars set I found a long time ago on a bargain table for $1.  The background heart was cut with the Cricut and behind that is a paper doily from Wiltons.  I found a place up here where I can buy 1,000 paper doilies for $14 so may pick up some and give them away in the future!


The recipe is...
Stamps:  Penny Black & Fiskars
Paper: Recollections and Staples 110 lb. white
Copics
Ribbon:  Wally World
CuttleBug Swiss Dots
Wilton Doily


 This next card is sort of a Valentine's Day card.  You can tell by the sentiment on the inside.  I used a stamp from Penny Black (Love her stuff!!) and then distressed around the edges at first and then in the middle to give it more oomph!  The background was done with the CuttleBug and then distressed with Honey.  The sentiment is one I picked from Inkadinkado after winning at The Outlawz!
The recipe is....
Stamps:  Penny Black & Inkadinkado
Paper:  Staples 110 lb white, Recollections
Cuttle Bug - Cant remember the folder name
Distress inks:  Festive Berries. Wild Honey, Versafine
Jellyroll Stardust Pen - Red 

 
This is one of my faves from this group.  I watched a video done by Jill Foster at the Penny Black bog and  did th version by memory a few days after watching it.   Mine is nowhere near the quality of Jill Fosters but I like the bright colours.  I had to use a different stamp from Stampendous called Agapanthus cluster and stamped the image five times using a different colour each time.

The recipe is...
Stamps:  Stampendous, Studio G
Inks:  Distress Wild Honey, Preserves, Shabby Shutters, Festive Berries, Broken China
Paper:  Staples, Recollections
Bling

The fourth and final card is really quite kewl IRL.  I cut the heart out of the front cardstock with the Cricut.  Red glimmer paper was taped to the back of the opening.  It was too bare so I added two heart layers done with the Cricut as well. 


The recipe is...
Stamp:  Inkadinkado
Paper:  Staples, Recollections
Stampendous heart stickers


Well, there you have it.  A glimpse of what I have been up to the past few days.  Thanks for looking and I hope you all have a wonderful week!

Hugs,
Sheree

Sunday 5 February 2012

Stampscapes - On The Inside Looking Out

Morning Chicks!

It's time for a new challenge at Craft A Scene so get your stamps out and join the fun!  The theme for February is Snow... I know, we are all looking forward to Spring now but with this being only our second challenge it's a great time to put snow in the scenes so we can get ideas for next fall when doing Christmas cards or what have you!  (I know you don't like snow down in Auzzieland Shaz but I'll be watching to see what you enter this month!!  And.. No excuses this month Gail!)

I have two scenes to show you today.  The second one will have photos of how the scene looks as it is being worked on.  Actually, I like the second one best of all!  Both are the same but, also very different.  And... Believe it or not. they are done with the exact same stamps but the glossy paper was cut into two different sizes.  Just doing that can change everything!

Scene #1
I had to do some fudging with stamps and taping them off to make everything fit.  The glossy cardstock was cut into six and away I went!  In the end, I only ended up with two of the smaller scenes that were worth keeping.  My rule of thumb is to do at least two identical scenes every time as something always goes wrong.  Some goof ups can be disguised and some are not worth saving.  Keep the wrong ones and use them to try different techniques as you progress be it colour, stamp placement, etc.

The scenes in this post are made up of Stampscapes stamps.  The images were stamped first and the first coat of colour was put on.  I left them overnight as some dye inks fade a bit and added more colour the next day.  A list of colours used will be posted down below.

Snow was added using a white craft paint pen and once that dried I added some MS fine clear glitter here and there to reflect light.
 
Scene #2
As stated above, this scene uses the exact same stamps as above, along with the same colour combinations.  What's different?  Well... This is how it would actually look standing inside the forest looking out to the meadow.  Large fir trees don't allow snow to penetrate to the forest floor for the most part.  I wanted to do something 'outside the box' for this larger scene.  It is mounted, but not on a card yet. It will be a 5 1/2 X 8 inch card and I was having one heckuva time trying to figure out just how to embellish this one to give it some oomphff!! (Yes, that's a word in my personal dictionary!)

Step 1:  Stamp the images on glossy card stock and colour with a stylus.  Leave overnight and add more colour where needed

Step #2:  Add snow using the craft paint pen.

Step #3:  I added clear glitter here and there to show highlights but, also to make it look like there had been a wind when it snowed and the flakes blew onto the tree trunks.
Here is a closeup!

Now... Here is the finished scene mounted!


The recipe for these scenes is...

Stamps:  Stampscapes
087F - Tree Trunk
088F -  Tree Trunk Trio
018E - Cloud Cumulous
299B - Three Rocks and Grass
301A - Rocks and Grass
050E - Lakeside Reflections
192B - Bush Large
272G - Prickly Branches

Inks Used:
Archival Black to stamp images
Adirondack Dye Inks:  Pesto, Latte, Aqua
Memento Dye Inks:  Bamboo, London Fog, Summer Sky
Ranger Distress Inks:  Walnut Stain, Black Soot, Gathered Twigs, Crushed Olive, Shabby Shutters

ColorBox Stylus with foam tips
Glue Pen
MStewart Clear Fine Glitter

Recollections Paper
Staples 110 lb. White Cardstock

There you have it!  Thanks for looking and don't forget to head on over to Craft A Scene to see all of the wonderful challenge entries for February and works of art from our Design Team!  Check out the DT
blogs as well for descriptions and directions for their designs.
Hugs,
Sheree


Challenges I have entered...

Christmas Inspirations - Anything Goes
Christmas Card Challenges- Christmas Card Challenges
Quirky Crafts Challenges - Make A Scene